Tag: recipes
How To Get Hash Browns Perfectly Crispy

How To Get Hash Browns Perfectly Crispy

By James P. DeWan, Chicago Tribune (TNS)

One thing I’ve said exactly 6 gajillion and 11 times is, there are more bad examples of food out there than there are good examples. Today’s topic, hash browns, is no exception. Too often, what should be a crispy, creamy, perfectly seasoned, standalone dish is reduced to little more than a bland and mushy ketchup delivery system. Let’s see what we can do to fix that.

WHY YOU NEED TO LEARN THIS

Do you eat breakfast? Well, then, say no more.

THE STEPS YOU TAKE

Now, before we start, let’s get our terms straight so we know exactly what we’re talking about. When I think of hash browns, I think of golden brown cakes of pan-fried shredded potatoes. Some people also include preparations where the potatoes are cut into small or medium dice, or even thin slices, but now you’re straying into home fries territory. For today, then, we’ll grab our graters and go with shredded.

Also, remember that hash browns are pretty much just potatoes. If you start adding binders, like egg or flour, well, now we’re talking potato pancakes or latkes. Those are terrific, too, mind you, but they’re not hash browns.

Let’s take a quick look at the ingredients:

Of course, there’s the potatoes. What kind of potatoes depends on whom you ask. Personally, I prefer Russets, the best-known variety of which are called Idaho potatoes. James Beard, the legendary food writer, preferred waxy or new potatoes which have less starch. Clearly, they’ll both work with slightly different results. You can decide for yourself.

Regardless of the type of potato, there seem to be two general schools of thought on Planet Hash Brown. One is to start with raw potatoes, the other is to start with previously cooked potatoes, typically boiled or baked. I’m in the raw camp, though I’ve had some great examples from the cooked camp. If you start with cooked potatoes, you can pretty much cut the cooking time in half. For my money, though, I think you get a somewhat more crispy product by starting with raw.

Next, there’s the fat. Remember that fat serves a number of functions, including heat transference, non-stickitude and, perhaps most important, flavor. For the first two functions, any fat or oil will work. For the last function, though, I would recommend lard, bacon fat or clarified butter. (You can use whole butter, but, because it has milk solids, you run a great risk of it burning.)

The last necessary ingredient is salt. Potatoes without salt are like chimps without bananas — just a little bit sad.

Now, you add other stuff as well, like a little minced onion, as long as you take care not to let it burn. For garlic, my inclination would be to crush a couple cloves and saute them slightly in the hot fat BEFORE you add the potatoes. Then, remove the garlic and add the potatoes. That way you get the flavor without the risk of burning.

You can also add herbs or spices. A little rosemary is nice, as is a bit of paprika. But, with all this stuff, I prefer it simple: potatoes, fat and salt — yum.

One last thing: the pan. Diners mostly make their hash browns on a flat top griddle. For the home cook, I think a good, nonstick pan works best. Some people love cast iron, too, but those things are so heavy, it makes it hard to flip the hash browns like you could if you’re using a light nonstick. If you’re going to flip it with a spatula anyway, go ahead with the cast iron. That’s probably what Abe Lincoln would have used.

OK, now let’s get to the actual making. I figure one big potato makes enough for two servings of hash browns. If you’re making a lot, keep potatoes in acidulated water until it’s time to cook. That will keep them from discoloring.

  1. Peel your potatoes and shred them with the largest hole of your grater. If you’re going to cook them right away, put them in a paper towel or clean dish towel and ring out as much water as you can. This will help them crisp up more quickly.
  2. Heat your nonstick skillet over a medium to medium-low flame. While it’s heating, season your potatoes with salt and anything else you might be adding (pepper, for example).
  3. Now, for most sauteed items, I add just enough fat to coat the bottom of the pan. For hash browns, I add a little more to make sure they really don’t stick and to add a little more flavor.
  4. Add enough grated potatoes that you can press them into a circle covering the whole pan. How thick a layer? Excellent question. The thinner the layer, the more crispy the whole thing will be. If you mound your potatoes more thickly, the interior will be soft and white while the exterior is all nice and crispy. I’m not about to tell you which way is better. That’s your choice. Aren’t you glad we’re not living in the Stalin-era Soviet Union? Cook them over medium low heat until the bottom is golden brown and crispy, 5 to 10 minutes. Flip the hash browns and do the same on the other side. Serve immediately, because they’ll lose their crisp if you try to hold them.

©2016 Chicago Tribune. Distributed by Tribune Content Agency, LLC.

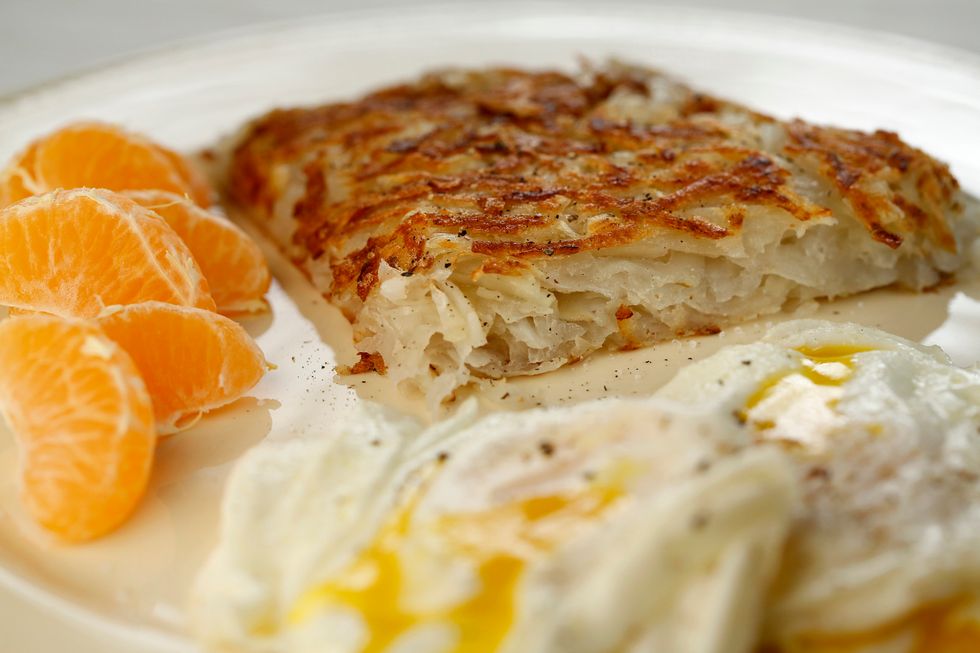
Photo: Browned and crispy outside, soft and yielding inside, your perfect hash browns will make your eggs proud. (Michael Tercha/Chicago Tribune/TNS)


Make A Meal … In A Toaster Oven

Make A Meal … In A Toaster Oven

By Daniel Neman, St. Louis Post-Dispatch (TNS)

Maybe your oven is on the fritz. Maybe you don’t even have an oven. Maybe you’re trying to conserve energy. Maybe you just like a challenge.

In any case, you don’t need an oven to cook. You don’t even need one to cook food that is ordinarily cooked in an oven. All you need is an appliance you already own.

If you’re like me, you tend to forget about the oven part of a toaster oven. You use it for toast, or maybe a bagel. But while a toaster oven does not necessarily make the best toast, it does make for a marvelously efficient oven.

Obviously, a toaster oven does have certain limitations. You can’t use it to cook a whole turkey, for instance. But anything that is small enough to fit in a toaster oven can be cooked in one. You can use it to make breakfast, lunch, dinner and dessert.

You can even use one to hard-cook an egg.

I know. I’d never heard of that either. But it truly works. You get a perfect, hard-boiled egg without having to boil it. There may be no reason why you would ever actually want to do this, but you have to admit it is pretty cool.

For breakfast, I made a frittata. But I didn’t want any old frittata, so I made a Greek frittata.

A Greek frittata is just any old frittata with spinach and Feta cheese added. But these two simple ingredients, along with halves of grape tomatoes, provide plenty of extra pop.

The ingredients also help to create pockets amid the eggs, so the dish is tantalizingly light and not dense. It’s just right for breakfast or brunch.

For lunch, I used the toaster oven to make a salmon sandwich. The genius of this dish is that the salmon is sliced thin before it is laid on a piece of flatbread or naan. The thin slices allow it to cook in just 3 minutes under the broiler.

The other bit of genius in this dish is the amount of herbs and spices it requires. For a single sandwich, the recipe calls for 1/2 teaspoon of dried thyme, 1/2 teaspoon of sesame seeds, 1/4 teaspoon of dried sumac and a tablespoon of chopped green onion.

I felt certain that would be far too much seasoning for just 3 ounces of fish, but I tried it as written, anyway. And, to my surprise, it was just right. Even if it had been a little strong, the flavors would have been tempered by a final dollop of yogurt and cucumber, which gives a nice breezy freshness to the whole sandwich.

For dinner, I went with kebabs, Moroccan-spiced pork kebabs.

No, they don’t generally eat pork in Morocco, but the spices work great with the slightly sweet meat.

This recipe has an easy answer to the time-honored question asked by kebabbers everywhere: How do you get the meat and the vegetables done at the same time? When the meat is ready to be eaten, the onion and other vegetables are still almost raw. If you cook them until the vegetables are done, the meat has become chunks of crispy cinders.

The solution is obvious, though for some reason I had never thought of it before. Put the meat on some skewers and the veggies on the others. Start cooking the vegetables first. Then, after the appropriate amount of time has elapsed, add the meat skewers.

And yes, this is easily done in a toaster oven, though to make a full-sized meal for a family you’ll have to do it in a couple of batches.

Dessert, naturally, came last. I made a simple apple crisp. I tossed chopped apples with lemon juice, brown sugar and cinnamon, topped it with more brown sugar, cinnamon and oats, then dotted the top with butter.

It turned out fine. It may not be the best dessert you’ll ever make, but you can make it in a toaster oven. That has to count for something.

Go to next page for recipes.

AMY’S TOASTER-OVEN APPLE CRISP

Yield: 4 servings

4 medium apples

1 1/2 teaspoons lemon juice

1 1/2 teaspoons cinnamon, divided

2 tablespoons brown sugar, divided

1 1/2 tablespoons all-purpose flour

1/4 cup oats

2 teaspoons water

1 tablespoon unsalted butter

1. Preheat toaster oven to 350 degrees.

2. Peel and chop apples. Toss with lemon juice, 1/2 teaspoon of the cinnamon and 2 teaspoons of the brown sugar.

3. Mix remaining 1 teaspoon cinnamon and 1 tablespoon plus 1 teaspoon brown sugar along with the flour and oats. Spread apples in a baking dish that fits inside the toaster oven. Spread topping on top.

4. Sprinkle water over crisp, then dot with small pieces of butter. Bake until top is browned and apples are soft, about 45 minutes.

Per serving: 183 calories; 4 g fat; 2 g saturated fat; 8 mg cholesterol; 2 g protein; 39 g carbohydrate; 24 g sugar; 3 g fiber; 20 mg sodium; 35 mg calcium.

Adapted from a recipe by Amy Johanna, via Calorie Count.

MOROCCAN-STYLE PORK KEBABS

Yield: 4 servings

1/4 cup orange juice

1 tablespoon tomato paste

1 clove garlic, minced

1 tablespoon ground cumin

1/8 teaspoon ground cinnamon

4 tablespoon olive oil, divided

1 1/2 teaspoons kosher salt, divided

3/4 teaspoon black pepper, divided

1 1/2 pounds boneless pork loin, cut into 1 1/2-inch chunks, see note

1 small eggplant, unpeeled, cut into 1-inch chunks

1 small red onion, cut into 8 wedges

Pita bread or flatbread, for serving

1/2 pint store-bought tzatziki, optional

1/2 small cucumber

2 tablespoons chopped fresh mint

Note: This dish would also work well with lamb, and would be more authentically Moroccan. If using wooden skewers, be sure to soak in water for at least 30 minutes.

1. Preheat toaster oven to 425 degrees.

2. In a large bowl, whisk together the orange juice, tomato paste, garlic, cumin, cinnamon, 2 tablespoons of the oil, 1 teaspoon of the salt and 1/2 teaspoon of the pepper. Add the pork or lamb and toss. Cover and refrigerate for at least 30 minutes or up to 8 hours.

3. Meanwhile, in a bowl, combine the eggplant, onion and the remaining 2 tablespoons of oil, 1/2 teaspoon salt and 1/4 teaspoon pepper. Place the vegetables on skewers, alternating eggplant and onion.

4. Transfer the vegetable skewers to a foil-lined baking tray. Bake for 20 minutes. Turn the vegetables.

5. Place the pork on skewers and add them to the tray. Bake until the vegetables are tender and the pork is cooked through, turning pork and vegetables once, about 25 minutes.

6. Meanwhile, wrap the bread in foil and place on top of the pork during the last 5 minutes. Transfer the skewers and bread to individual plates. Spoon the tzatziki, if using, on the side and sprinkle with cucumber and mint.

Per serving: 399 calories; 25 g fat; 5 g saturated fat; 90 mg cholesterol; 32 g protein; 13 g carbohydrate; 7 g sugar; 5 g fiber; 791 mg sodium; 43 mg calcium.

Recipe from Real Simple, by Frank Mentesana.

TEN-MINUTE ROLLED SALMON SANDWICH

Yield: 1 serving

1 (3-ounce) salmon fillet

1 piece of flatbread or naan

Pinch of salt

1 tablespoon chopped green onion

1/4 teaspoon dried sumac, see note

1/2 teaspoon dried thyme

1/2 teaspoon sesame seeds

1 tablespoon plain yogurt

1/4 English cucumber, peeled and diced

1 tablespoon fresh mint, optional

Note: Sumac is a spice popular in Middle Eastern cuisine. It is available at international grocery stores.

1. Cut the salmon on a 45-degree angle into 1/4-inch-thick slices. Lay the slices flat toward the center of the bread. Add a pinch of salt.

2. Sprinkle the salmon evenly with the green onion, sumac and thyme, finishing with the sesame seeds. Turn the toaster oven to the broil setting and allow it to get hot. Place the bread in the toaster oven and broil 3 minutes or until salmon is cooked to the desired temperature (3 minutes will yield a pink salmon). While salmon is cooking, combine yogurt and cucumber.

3. Carefully remove bread from the oven and lay on a plate. Spoon the yogurt and cucumber mixture evenly across the salmon and sprinkle with the mint. Roll into a sandwich or eat open face.

Per serving: 315 calories; 10 g fat; 2 g saturated fat; 56 mg cholesterol; 25 g protein; 30 g carbohydrate; 3 g sugar; 1 g fiber; 477 mg sodium; 68 mg calcium.

Recipe by Jeffrey Saad, via The Dr. Oz Show.

TOASTER-OVEN ‘HARD-BOILED’ EGGS

Yield: 1 serving per egg

Large eggs

1. Preheat toaster oven to 350 degrees. Fill a bowl with ice water and set aside. Place eggs directly on the toaster-oven rack; if they are parallel to the grate they won’t roll around. Don’t cook too many at once; leave plenty of room around the eggs. Bake about 25 minutes.

2. Remove eggs from oven and immediately immerse in the ice water. Leave them until cold, about 15 minutes.

Recipe by Ashley DIY.

GREEK FRITTATA

Yield: 5 servings

2 tablespoons olive oil

10 large eggs

1 teaspoon kosher salt

1/2 teaspoon black pepper

5 ounces baby spinach

1 pint grape tomatoes, halved

4 scallions (green onions), thinly sliced

4 ounces feta cheese, crumbled

1. Preheat toaster oven to 350 degrees.

2. Add the oil to a 2-quart casserole (make sure it fits) and transfer to toaster oven for 5 minutes. Meanwhile, whisk together the eggs, salt and pepper in a large bowl. Stir in the spinach, tomatoes and scallions.

3. Remove casserole from oven and pour in egg mixture. Sprinkle feta over top. Bake until the frittata is browned around the edges and slightly puffed, and a knife inserted in the center comes out clean, 25 to 30 minutes.

Per serving: 280 calories; 20 g fat; 7 g saturated fat; 392 mg cholesterol; 17 g protein; 8 g carbohydrate; 3 g sugar; 2 g fiber; 637 mg sodium; 203 mg calcium.

Adapted from a recipe in Real Simple by Frank Mentesana.

©2015 St. Louis Post-Dispatch. Distributed by Tribune Content Agency, LLC.

Photo: Salmon Sandwich prepared in a toaster oven on Wednesday, Oct. 28, 2015, in St. Louis. (Chris Lee/St. Louis Post-Disapatch/TNS)

Grownup Treats For Leftover Halloween Candy

Grownup Treats For Leftover Halloween Candy

By Daniel Neman, St. Louis Post-Dispatch (TNS)

In all good conscience, I cannot really recommend that anyone try the recipes in this story. They may sound delicious — and believe me, they are — but they are the kind of food that a person could happily go his entire life without eating.

I’m talking about dishes made with leftover Halloween candy.

Any normal person takes candy that was not distributed to neighborhood ghosts and goblins and Kardashians and furtively devours it right out of the bag in the day or two after Halloween. But some people, those blessed with a specific kind of inspiration, look at the candy in its wrappers and see a blank culinary canvas.

“Snickers bars just don’t have enough calories on their own,” I imagine them saying. “How can I make them even more fattening?”

The answer, I am heartily sorry to say, is to add Cool Whip. And cream cheese. And powdered sugar.

Mix it all together, add chopped Granny Smith apples for tartness, and you have what is laughingly called a Snickers salad.

It’s good for you because it is a salad, right? Besides, it’s got those apples.

How does it taste? It tastes great. Of course it tastes great. It is totally evil and it was probably invented by some kind of evil genius, and anything so evil is almost certain to taste great.

But I was just getting started. I wanted more. Something even more decadent.

And thus it was that I was skating across the Internet when I ran smack dab into Milky Way vodka.

There it was: Something more decadent than a Snickers salad.

Milky Way vodka is what happens when you melt a bunch of Milky Ways and add them to vodka. The process is a little bit time consuming, but the whole thing, start to finish, only took me about a half-hour. And when it was over I had a bottle of Milky Way vodka.

Melting Milky Way bars is a little trickier than it sounds. You need to chop them up for speedier melting, and then stir them in a double boiler until they are thoroughly melted. They don’t turn into a liquid when they melt, they are stringy and sticky instead, but don’t worry. They liquefy with the addition of the vodka.

If that process is too much trouble, there is an easier way. Slice the Milky Way bars thin enough to fit in the neck of a bottle, and put them in a bottle of vodka. Tightly close the bottle and then run it through the dishwasher.

Seriously. The dishwasher cycle is hot enough to melt the candy bars in the bottle. Well, you may have to run it through twice. But it works. And again, when it is over you have a bottle of Milky Way vodka. A clean bottle.

Even easier, but admittedly less spectacular, is Halloween candy bark, though this recipe is not without a little spark of evil of its own.

You take chocolate. You melt it. Then you add chopped-up bits of leftover Halloween candy into that. What you end up with is chocolate, with chocolate stuck to it.

It is helpful to have different textures and colors in the Halloween candy you are adding; otherwise you end up with an unappetizing (but still delicious) blob of chocolate. Candies with nuts and crispy bits, and the colored shells of M&Ms, make a big difference.

Yes, it is sort of a mishmash. But in keeping with the spirit of the season, you can think of it as a monster mishmash.

Finally, I completely went over to the dark side (dark being the general hue of most candy bars) and made that highly popular fair food, fried candy bars.

Fried candy bars must have been invented by a cardiologist with a lot of payments still to make on his boat. There are those who will say the very thought of them is enough to close your arteries. There are others who will say it is totally worth it.

And fried Halloween candy bars are even better (and therefore worse) than regular ones because they are smaller. The smaller the bar, the larger the proportion of surface to be battered and fried.

If it helps, think of fried candy bars as chocolate tempura. The candy is dunked into a beer batter that fries up light and crispy while the chocolate inside starts to melt. When you bite into it, you get a delicate crunch followed by a gooey middle.

It’s ridiculously excessive, of course, but so is the whole concept of Halloween candy.

The recipe I used, incidentally, suggests serving them warm with vanilla ice cream. That’s ice cream calories on top of fried batter calories on top of chocolate calories.

In all good conscience, I can’t recommend that.

See next page for recipes.

©2015 St. Louis Post-Dispatch. Distributed by Tribune Content Agency, LLC.

Photo: Halloween Candy Bark. (Huy Mach/St. Louis Post-Dispatch/TNS)

HALLOWEEN CANDY BARK

Yield: 10 servings

20 ounces milk chocolate

15 pieces or packs of assorted Halloween candy, about 1 to 1 1/2 cups

1. Line a baking sheet with aluminum foil, smoothing out any creases. Cut the candy bars into pieces. Set aside.

2. Create a double boiler by suspending a glass or metal bowl over a saucepan of simmering water, making sure the bowl doesn’t touch the water. Add milk chocolate and stir until melted and smooth. Do not overheat the chocolate.

3. Remove the bowl from the pan. Pour the melted chocolate onto the prepared baking sheet, using an offset or rubber spatula to spread it into a 10-by-12-inch oblong, about 1/4-inch thick. Press the candy pieces into the chocolate, arranging them so each bite has a mix of flavors, colors and textures. Refrigerate the chocolate for 1 hour to completely set before breaking it into large pieces. Store in an airtight container at room temperature for 1 to 2 weeks.

Per serving: 420 calories; 22 g fat; 13 g saturated fat; 15 mg cholesterol; 6 g protein; 51 g carbohydrate; 42 g sugar; 2 g fiber; 97 mg sodium; 126 mg calcium.

Recipe by Michelle Buffardi, via Cooking Channel

MILKY WAY VODKA

Yield: About 13 (2-ounce) servings

1 (750 ml) bottle vodka

1/2 (11-ounce) bag fun-size Milky Way bars, about 10, or 5 regular size bars

1. Pour out about 20 percent of the vodka from the bottle and save for future use. Slice the fun-size candy bars in half or cut up the regular-size bars into several pieces. Put a double boiler on to simmer, or create your own by placing a glass or metal bowl over the water, but not touching it.

2. Add the candy to the double boiler and stir. As the candy is melting, stir in a little bit of the vodka at a time. Keep mixing until everything becomes a smooth blend.

3. Pour the mixture back into the bottle and store in the freezer. The vodka will not freeze.

Alternatively:

1. Pour out about 25 percent of the vodka from the bottle and save for future use. Cut up the candy bars until they can fit into the neck of the bottle. Add the candy to the bottle of vodka. Seal tightly.

2. Run the bottle through the dishwasher cycle. When done, shake the bottle to combine. If necessary, run the bottle through the cycle again.

3. Store in the freezer. The vodka will not freeze.

Per serving: 154 calories; 2 g fat; 1 g saturated fat; 1 mg cholesterol; no protein; 9 g carbohydrate; 7 g sugar; no fiber; 20 mg sodium; 12 mg calcium.

Recipe adapted from wikihow.com

FRIED CANDY BARS

Yield: 4 servings

Oil, for frying

1 3/4 cups all-purpose flour

Pinch salt

1 (12-ounce) bottle beer

8 Halloween-size candy bars (I used Snickers, Reese’s, Milky Way and Hershey’s bars)

1. Heat the oil in a deep fat fryer to 375 degrees, or in a large, heavy-bottomed saucepan, pour enough oil to fill the pan a few inches deep. Heat over medium heat until a deep-frying thermometer reaches 375 degrees or until a cube of bread dropped into the oil turns brown in 3 minutes.

2. Add flour and salt to a mixing bowl and whisk in the beer. Dip the candy bars into the batter, being careful to completely cover the chocolate. Drop the candy bars into the hot oil and fry until golden brown, about 3 minutes. Serve warm.

Per serving: 315 calories; 10 g fat; 4 g saturated fat; 3 mg cholesterol; 5 g protein; 45 g carbohydrate; 12 g sugar; 1 g fiber; 45 mg sodium; 31 mg calcium.

Recipe adapted from Chuck Hughes, via Cooking Channel

SNICKERS SALAD

Yield: 10 servings

8 ounces cream cheese, softened

1 cup powdered sugar

12 ounces frozen whipped topping, such as Cool Whip, thawed

1 (11.18 ounce bag) fun-size Snickers bars, about 19

2 Granny Smith apples

1. Using an electric mixer, mix cream cheese and powdered sugar until thoroughly blended. Fold in thawed whipped topping. Cut Snickers bars into bite-size chunks and add to mixture. Chop the apples into bite-size chunks; stir into mixture.

2. Chill at least 1 hour before serving. Chilling several hours, such as overnight, will lead to some liquid separating from the salad.

Per serving: 399 calories; 21 g fat; 14 g saturated fat; 28 mg cholesterol; 4 g protein; 47 g carbohydrate; 36 g sugar; 2 g fiber; 133 mg sodium; 55 mg calcium.

Adapted from a recipe by food.com

The Thrill Of The Dill

The Thrill Of The Dill

By Daniel Neman, St. Louis Post-Dispatch (TNS)

To my mind, dill is the forgotten herb.

I mean that literally. Whenever we plant it in the garden, I forget all about it until it bolts and has to be cut down.

I don’t know why this is. I like dill. That’s why we plant it. I like its unique, sharp, unmistakable taste. I like the way it goes with salmon. I like what it does to lemon, and what lemon does to it. I like the way Eastern Europeans sprinkle it over basically all their soups.

And yet, I can go weeks without once thinking of dill. Months, maybe.

So to remind myself of what it is about dill that makes it so alluring, I decided to use it in an assortment of dishes. One, obviously, is salmon; the fish and the herb were absolutely meant for each other. Another is one of those Eastern European soups, though in this one dill actually comprises the main flavor. A third is a chicken dish, because I don’t usually think about dill going with chicken (when I think about dill at all which, as we have seen, is rare).

And the fourth is potatoes. And cream. And dill.

We’ve probably all had potato salad with dill; as the potato luxuriates in the creamy mayonnaise, the dill asserts itself as a fragrant culinary counterpoint. It’s good stuff, but it can’t compare to creamy dill potatoes.

Creamy dill potatoes (I took the liberty of changing the name from “comforting dill potato recipe”) transcend the ordinary pleasures of a dill-flavored potato salad because of one basic, indisputable fact: mayonnaise is good, but cream is better.

First, you boil baby potatoes or small red potatoes until they are fully cooked. As they are simmering away, you saute a sweet onion in a lot of butter and then you add some cream. Good, thick, heavy cream. You could use light cream or half-and-half if you wanted to, I suppose, but why bother? The whole dish is made by the way the heavy cream decadently blends with the onions.

The dill that is added only makes the flavors pop even more. And when this sauce coats the potatoes, it is superb.

Next up was the salmon, perhaps the most natural pairing that exists for dill. In general, dill cuts through the silken richness of salmon while the two flavors play merrily off each other.

But the version I made adds a couple of other ingredients that effortlessly complement the combination. Foremost of these is sour cream. The extravagance of the sour cream is then tempered with a few mildly astringent ingredients: shallot or onion, Dijon mustard, lemon juice and the dill.

Part of this mixture is spread over the salmon before baking, with the rest of it served on the side. But you may want to hold off on using it all with the fish because it has another excellent use _ it makes an incredible dip for potato chips. Seriously. The blended flavors perk up even more when introduced to fried thin potato slices and salt. You could use it for crudites, too.

For my chicken dish, I chose a recipe for lemon and dill chicken from EatingWell magazine. The dish employs what I like to think of as a culinary syllogism.

Chicken goes well with lemon. Lemon goes well with dill. Therefore, chicken goes well with lemon and dill.

I’m not certain that method of thinking is completely accurate for all situations (cinnamon goes well with toast, toast goes well with bacon, therefore cinnamon goes well with bacon?). But it certainly works in this particular case.

The secret is the sauce. Onion and garlic are sauteed in the same pan you used to sear the chicken breasts. Add chicken broth thickened a bit with flour, and stir in the dill and lemon juice. Continue cooking the chicken in the sauce, garnish with more dill (of course) and you have a delicious dinner.

Finally, I made a zupa koperkowa, a dill soup from Poland. This is a flavorful but thin soup made richer by sour cream and embellished with batter dumplings.

The soup is awfully good by itself (I made it with a mixture of veal and chicken stocks, but the next time I’ll just use chicken), and this is the only dish in which the dill gets a chance to shine by itself. But what really makes this soup sing are the batter dumplings.

You simply whip together an egg, some flour and some salt and drizzle it into the simmering soup. In one minute, you have delicious dumplings that are remarkably easy to make.

The soup can also be made with potatoes or hard-boiled eggs. I added a couple of baby potatoes left over from making the creamy dill potatoes, and they were great. I’m sure the egg would be equally delicious.

But make the dumplings. They are so good, and they are so perfect with the soup, that you will find yourself remembering always to use dill.

LEMON AND DILL CHICKEN
Yield: 4 servings
4 boneless, skinless chicken breasts (1 to 1 { pounds total)
Salt and pepper, to taste
1 tablespoon extra-virgin olive oil or canola oil
{ cup finely chopped onion
2 cloves garlic, crushed
1 cup chicken broth
2 teaspoons all-purpose flour
3 tablespoons chopped fresh dill, divided
2 tablespoons lemon juice
1. Season chicken breasts on both sides with salt and pepper. Heat oil in a large, heavy skillet over medium-high heat. Add the chicken and sear until well-browned on both sides, about 3 minutes per side. Transfer chicken to a plate and tent with foil. Do not clean skillet.
2. Reduce heat to medium. Add onion and garlic and cook, stirring for 1 minute. In a separate bowl, whisk together broth, flour, 2 tablespoons of the dill and lemon juice and add to pan. Cook, whisking, until slightly thickened, about 3 minutes.
3. Return the chicken and any accumulated juices to the pan; reduce heat to low and simmer until the chicken is cooked through, about 4 minutes. Transfer the chicken to a warmed platter. Remove the garlic cloves. Season sauce with salt and pepper and spoon over the chicken. Garnish with the remaining 1 tablespoon chopped dill.
Per serving: 172 calories; 6 g fat; 1 g saturated fat; 63 mg cholesterol; 24 g protein; 4 g carbohydrate; 1 g sugar; no fiber; 288 mg sodium; 22 mg calcium.
Adapted from a recipe from EatingWell
CREAMY DILL POTATOES
Yield: 5 servings
2 pounds new baby potatoes or small red potatoes, the largest ones cut in half
2 \ teaspoons salt, divided
3 tablespoons butter
1 medium sweet onion, chopped
{ cup whipping cream
[ teaspoon black pepper
{ cup (or }-ounce package) dill fronds, chopped
1. Put potatoes in a large saucepan and just cover with water. Add 2 teaspoons of the salt, and stir. Over high heat, bring to a simmer. Reduce heat to low, stir, and partially cover the pot. Simmer potatoes until they are fork-tender, 5 to 10 minutes.
2. Meanwhile, melt butter in a large skillet over medium heat. Add the onion and cook, stirring occasionally, until translucent, about 3 to 5 minutes. Stir in the cream and the remaining \ teaspoon of salt and the pepper. Bring the cream to a boil, stirring constantly.
3. Remove from the heat and add the dill. Drain the potatoes and add them to the skillet, turning them over in the cream sauce until covered.
Per serving: 280 calories; 16 g fat; 10 g saturated fat; 51 mg cholesterol; 4 g protein; 32 g carbohydrate; 4 g sugar; 4 g fiber; 277 mg sodium; 43 mg calcium.
Adapted from cookthestory.com

DILL SOUP WITH DUMPLINGS (ZUPA KOPERKOWA)
Yield: 4 servings
2 tablespoons butter, divided
} cup finely chopped dill, divided
6 cups of stock: chicken, veal, beef or vegetable
6 { tablespoons all-purpose flour, divided
{ cup cold water
1 large egg
[ teaspoon salt
1 egg yolk
{ cup sour cream
Salt and pepper to taste
Note: Along with the dumplings, this soup can also be served with boiled potatoes or hard-boiled eggs cut into wedges
1. Melt 1 tablespoon butter in a skillet, add \ cup dill and saute gently over low heat for 1 to 2 minutes. In a large pot, heat stock to boiling and add the dill and butter mixture. Dissolve 3 tablespoons of the flour in the cold water and add to the stock. Bring the stock back to a simmer.
2. To make the dumplings, combine the egg, the remaining 3 { tablespoons of flour and the salt, and beat with a whisk or fork for 2 minutes until smooth. Drizzle batter slowly into simmering stock from a spoon or fork and cook for 1 minute. Keep the soup at a simmer to avoid disintegrating the dumplings.
3. Melt the remaining 1 tablespoon of butter, place in a small bowl and beat in the egg yolk. Gradually add 1 cup of the boiling stock and stir well. Stir in the sour cream until the mixture is smooth. Return this mixture to the soup pot and simmer for 1 to 2 minutes, but do not boil.
4. Turn off the heat, add the remaining { cup dill, stir, cover and let stand for 2 to 3 minutes. Add salt and pepper to taste.
Per serving: 305 calories; 17 g fat; 8 g saturated fat; 131 mg cholesterol; 13 g protein; 24 g carbohydrate; 7 g sugar; no fiber; 629 mg sodium; 58 mg calcium.
Recipe by Laura and Peter Zelanski of polishclassiccooking.com

BAKED SALMON WITH MUSTARD-DILL SAUCE
Yield: 4 to 6 servings
1 cup sour cream
1/3 cup chopped fresh dill
3 tablespoons finely chopped shallot or onion
2 tablespoons Dijon mustard
Juice of { lemon
1 { pounds center-cut salmon fillet with skin
1 teaspoon minced garlic
Salt and pepper, to taste
1. Whisk sour cream, dill, shallot or onion, mustard and lemon juice in a small bowl to blend. Season sauce to taste with salt and pepper. Let stand at room temperature for 1 hour.
2. Preheat oven to 400 degrees. Lightly oil a baking sheet. Place salmon, skin-side down, on prepared sheet. Sprinkle with garlic, salt and pepper; spread with 1/3 cup sauce. Bake salmon until just opaque in center, about 20 minutes. Serve with remaining sauce (or use sauce as a dip for potato chips or crudites).
Per serving (based on 6): 220 calories; 11 g fat; 5 g saturated fat; 70 mg cholesterol; 25 g protein; 3 g carbohydrate; 1 g sugar; no fiber; 233 mg sodium; 47 mg calcium.
Adapted from a recipe in Bon Appetit

(c)2015 St. Louis Post-Dispatch. Distributed by Tribune Content Agency, LLC.

Photo: Creamy Dill Potatoes. (Cristina M. Fletes/St. Louis Post-Dispatch/TNS)